![]()
Counter-Strike: Condition Zero is a first person action game. The dedicated server component can be run as a Windows Service using FireDaemon Pro, which allows you to have the dedicated server start automatically at boot prior to login, start multiple instances of the dedicated server and more. This HOWTO will show you how to set it up. You can also use FireDaemon Fusion to manage FireDaemon and other Windows services via a web browser.
Counter-Strike: Condition Zero Dedicated Server Setup Under FireDaemon Pro
First download and extract SteamCMD. The download is small (< 2 MB).
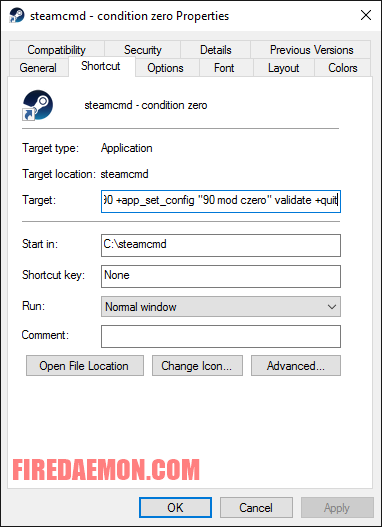
Go to the directory where you installed SteamCMD and create a shortcut to "SteamCMD.exe". Next edit the properties of the shortcut and in the target box, at the end of it (with a space before the following), put:
+login anonymous +force_install_dir "C:\CSCZ" +app_update 90 +app_set_config "90 mod czero" validate +quitThe target box should now look something like:
C:\SteamCMD\steamcmd.exe +login anonymous +force_install_dir "C:\CSCZ" +app_update 90 +app_set_config "90 mod czero" validate +quit
Now click the shortcut you created and let it run to download the Counter-Strike: Condition Zero server files. It might take a few hours to update everything. You should also run the shortcut every week or so to grab the latest server updates. Make sure to stop your server first.
Counter-Strike: Condition Zero uses one configuration file to store its settings. You can find it in "CSCZ\cfg\server.cfg" in the directory where you installed the server. You can also find an example configuration file at the end of this HOWTO.
Download and install FireDaemon Pro into the directory of your choice, typically C:\Program Files\FireDaemon.
Next start the FireDaemon GUI from the desktop shortcut. Click on the "Create a new service definition" button in the toolbar (or type Ctrl+N) and enter the information into the fields as you see below. Adjust the paths to suit your installation. Note the required parameters.
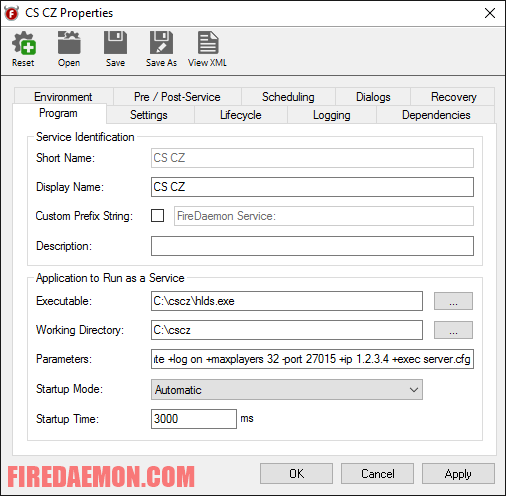
Executable: The path to your hlds.exe file. The path in this example is C:\CSCZ\hlds.exe.
Working Directory: The directory containing your hlds.exe file. The path in this example is C:\CSCZ\hlds.exe.
The most important field on the tab is the Parameters. The Parameters define the initial setup of your server. Here’s the full parameter list you should have:
-console -game czero -secure +map as_oilrig -autoupdate +log on +maxplayers 32 -port 27015 +ip 1.2.3.4 +exec server.cfg
- "-console" enables text base server display. The server can only be automatically restarted in text based mode.
- "-game" loads the mod.
- "-secure" enables VAC (Valve Anti Cheat) protection of your server. You can remove this command if you do not want to use VAC.
- "+map" loads a specified map on server startup. You can change "as_oilrig" to whatever map you want. This command should never be removed.
- "-autoupdate" Enables auto update of the server. Valve has not implemented this in Windows so you will have to manually update Counter-Strike: Condition Zero yourself. It’s here for the sake of legacy support if Valve ever decides to add it.
- "+log on" Displays the output of information on the screen. You can turn it off (+log off), but keeping it on makes it easier to debug any errors you might encounter.
- "maxplayers 32" This controls the maximum of amount of players you want your server to run. You can only control the max players on server startup. This command should never be removed.
- "-port 27015" This is the default server port. You can change it to anywhere from 27015 to 27020. Changing it is generally used when you host multiple servers (as each server has to use its own port when using the same IP). This command should never be removed.
- "+ip" should be the IP of your computer (not 127.0.0.1, go here to get your IP). This command should never be removed.
- "+exec server.cfg" This simply executes your server.cfg file on server startup. If you run multiple servers from the same installation, you can specify other config files (eg. server2.cfg)
Now click on the Settings tab. If you DON'T want to see your dedicated server running, uncheck the Interact with Desktop check box & select "Hidden" from the "Show Window" dropdown. You can optionally run Counter-Strike: Condition Zero as the user you installed it as. In the Logon Account field type your username (e.g. Administrator) and then enter the user's password twice in the Password and Confirm fields. You can also change the Process Priority to allocate more CPU time to the dedicated server or specify which CPU or core the dedicated server will run on (in the case of multi-processor, hyperthreaded or multi-core CPUs).

Now click on the Lifecycle tab. Uncheck Graceful Shutdown as the server doesn't respond to it.

Now click OK to finish setup and start your Counter-Strike: Condition Zero server!
Example Configuration File
Below is an example server.cfg file:
// server name
hostname "Counter-Strike Condition Zero Server"

// rcon passsword
rcon_password "CHANGEME"

// server cvars
mp_friendlyfire 0
mp_footsteps 1
mp_autoteambalance 1
mp_autokick 0
mp_flashlight 0
mp_tkpunish 1
mp_forcecamera 0
sv_alltalk 0
sv_pausable 0
sv_cheats 0
sv_consistency 1
sv_allowupload 1
sv_allowdownload 1
sv_maxspeed 320
mp_limitteams 2
mp_hostagepenalty 5
sv_voiceenable 1
mp_allowspectators 1
mp_timelimit 25
mp_chattime 10
sv_timeout 65

// round specific cvars
mp_freezetime 6
mp_roundtime 5
mp_startmoney 800
mp_c4timer 45
mp_fraglimit 0
mp_maxrounds 0
mp_winlimit 0
mp_playerid 0
mp_spawnprotectiontime 5

// bandwidth rates/settings
sv_minrate 0
sv_maxrate 25000
decalfrequency 10
sv_maxupdaterate 60
sv_minupdaterate 10

// server logging
log off
sv_logbans 0
sv_logecho 1
sv_logfile 1
sv_log_onefile 0

// operation
sv_lan 0
sv_region 0

// RCON Protection
sv_rcon_banpenalty 60
sv_rcon_maxfailures 10
sv_rcon_minfailures 5
sv_rcon_minfailuretime 45

// execute ban files
exec banned_user.cfg
exec banned_ip.cfg