How to enable font smoothing when connecting via RDP.
When you use Remote Desktop Protocol (RDP) to connect to a remote machine, you may notice that the FireDaemon Pro toolbar looks distorted. The reason why it happens is that by default Clear Type Font Smoothing is disabled in the server side of your RDP session. The lack of Font Smoothing can make the toolbar in FireDaemon Pro look distorted. This needs to be turned on manually, both on the host and remote computers. This guide explains how to do it.
On the host computer
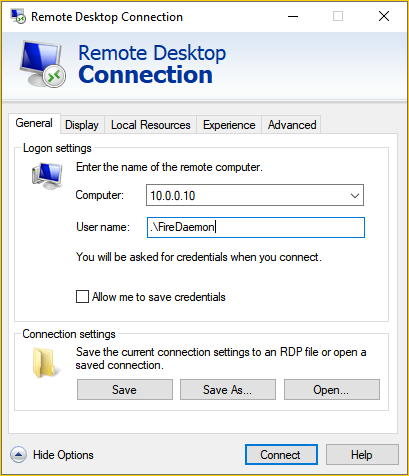
Step 1. Open the Remote Desktop Connection (RDP) client. You can access the client by typing "Remote Desktop Connection" in the Start search bar.Step 2. Enter the name of the remote computer. This can be the computer's name on your network or the IP address. Click "More Details" to enter your username and password.

Step 3. Enter your username on the remote computer. Ensure that this username requires a password to log on to Windows.
Step 4. Now click the Experience tab. Select the type of Internet connection you plan to use. Be sure not to select "Detect Connection Quality Automatically", as this will disable all the settings. After selecting a connection type, be sure the "Font smoothing" box is checked.

Step 5. Click "Connect" and enter the user's password. After clicking OK and successfully connecting, you may be told that the identity of the remote computer could not be verified due to problems with the security certificate. Examine the information, and if all is well, click Yes to allow the connection.
On the remote computer
ClearType needs to be enabled on the remote computer in order for font smoothing to work. Exact instructions vary with the version of Windows you're using. On Windows 10, visit the Control Panel and click on "Fonts". Select "Adjust ClearType Text" and ensure that it is turned on.

Follow the instructions in the dialog box to adjust ClearType accordingly.

